Manage Scheduled Jobs
You can use the Background Processes page to:
- Run a selected job immediately. To run a job, it must be active.
- Re-initialize the background processing system if the service appears not to be running.
You can add or edit jobs and then schedule them so that they are executed as a background process. For example, a job refreshes the students in the dynamic groups you created using Views. You can schedule it to run on an interval of your choice. You can also specify whether or not it runs (Active Yes or No) and who is notified when it completes.
The page also displays existing SQL jobs which you can only view, activate, or deactivate, but cannot add or edit from Anthology Student. For example, there is a job that refreshes the students in dynamic groups using a query. For SQL jobs, you cannot change the interval. You can specify whether it runs (Active Yes or No) and who is notified when it completes.
Prerequisites
You must have System Administration - Processes - Manage authorization.
You should also be familiar with the Background for Scheduled Jobs in Anthology Student.
Access Method
Select the Processes tile > locate System Administration > select Background Processes.
Procedure to Run a Job or Reset a Service
-
Select the Schedule tab.
-
To run the job, select an active job in the grid and select the Run Now button on the toolbar.
Anthology Student executes the job.
-
To reset the background processing system, select the Reset Service button on the toolbar.
Anthology Student background processing system re-initializes the recurring jobs from the scheduled jobs list. This resets the background processing system. It is not related to any specific job in the list.
Procedure to Add or Edit Jobs
-
Select the Schedule tab.
-
If you want to:
-
Add a new list item, select the New button on the toolbar
-
Edit an existing list item, select the name in the list
-
Add a new list item by copying and modifying an existing list item, select the row in the list, and select the Duplicate button on the toolbar
-
-
Review, specify, or change the following values. The fields that are displayed will vary depending on the job type.
-
If you selected Webhook and you want to add job parameters, select Add Parameter to add the parameter key and parameter value.
-
If you want to save and:
-
Continue making changes, select the Save button
-
Continue to add another item to the list, select the Save & New button
-
Close, select the Save & Close button
-
When the job is executed, Anthology Student displays the results on the History tab.
For information about scheduled jobs, refer to the "Scheduled Jobs Migration for Anthology Cloud" topic in the Administration and Configuration Help for the version of the product at help.anthology.com .
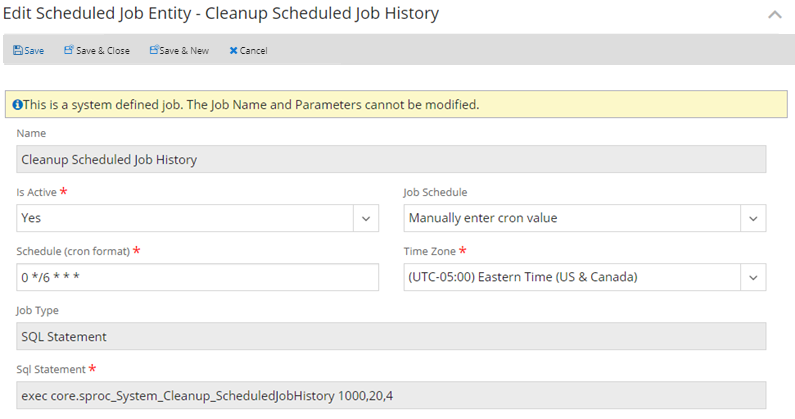
Example of a Cleanup Job
The following example of a cleanup job specifies that 1000 history records will be kept across all jobs, with up to 20 entries (rows) per job type. After 4 weeks, all history records are deleted.
@MaxEntries INT = 1000,
@MaxPerJob INT = 20,
@MaxWeeks INT = 4
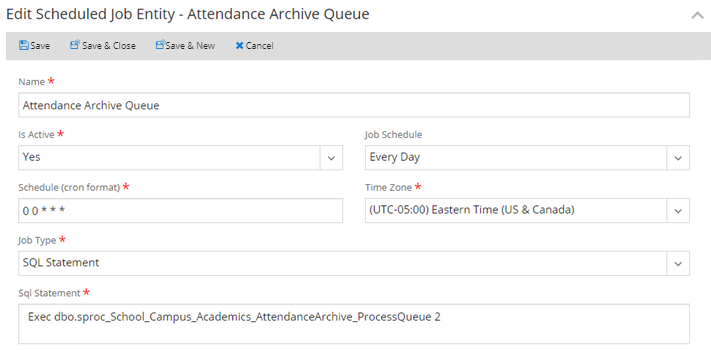
Example of an Archive Attendance Job
The following example displays the job that archives attendance daily.
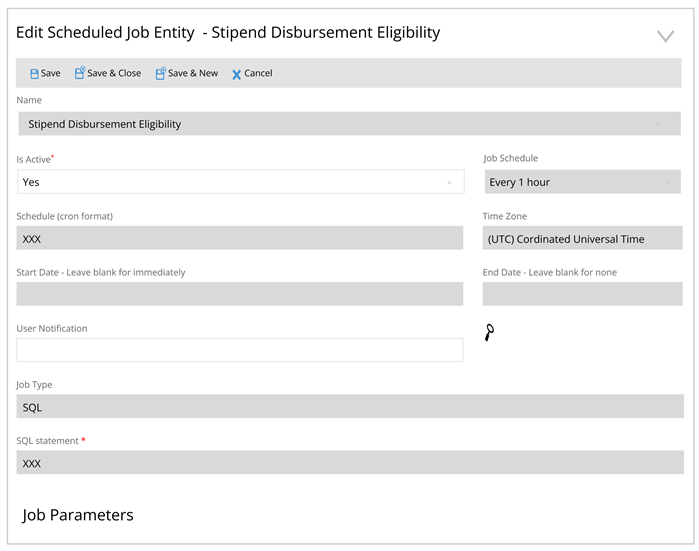
Example of a Scheduled Stipend Disbursement Eligibility Job
Once a job is created, Bursary Central will check all of the Stipend Disbursement Schedule for rows with status set to any value other than "Processed". The Stipend Disbursement Schedule is assigned to student profiles based on assignment criteria defined during its configuration. The job created here will check and assign a status to the stipend schedule after checking the students' eligibility.
The following table represents the status of jobs scheduled here and the appropriate statuses with reasons that will be assigned to the Stipend Schedule:
| Job Status | Schedule Status | Reasons |
|---|---|---|
| On-hold | Hold | Stipend on hold |
| Eligible | Eligible |
|
The following example displays the job that checks students' eligibility for Stipend Disbursements daily. The IsActive and User Notification fields are editable. The other parameters are defined by Anthology Student International and can be customized upon request.
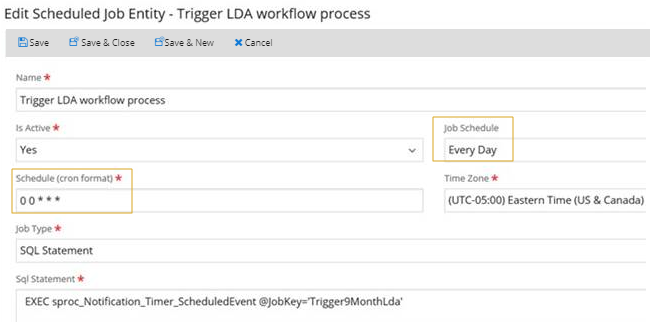
Example of a Scheduled Workflow Job
Previously, when an institution created a workflow based on a schedule, the process was to schedule an SQL job to trigger the workflow.
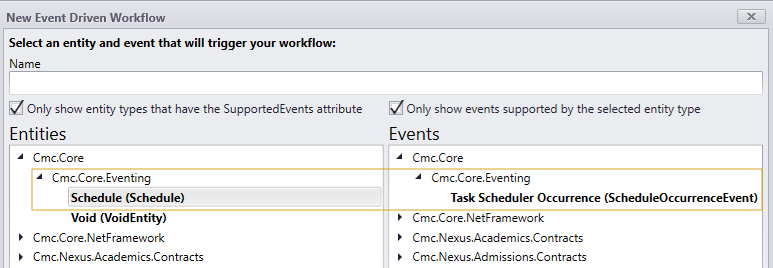
With Anthology Student 20.0 and later, you can trigger workflows with scheduled jobs created in Anthology Student.
-
Sign in to Anthology Student with an Administrator User ID. You must have permission for the Admin.BackgroundProcesses.View and Admin.BackgroundProcesses.Save operations.
-
Select the Processes tile > locate System Administration > select Background Processes.
-
Select the New button and specify the schedule parameters. The schedule in the example below will execute the job every day at midnight.
When you select a value from the Job Schedule drop-down, the Schedule (cron format) field is populated automatically. You can also specify a custom cron string. For more information, refer to Examples of crontab expressions.
-
Save the new job. Select it in the Scheduled Jobs grid and select Run Now to test it.

-
View the details by expanding the row.

Limitations
You cannot edit the following values for list items that have a Yes in the System Job column:
- Job Name
- Job Parameters
- Job Type — The fields that are displayed depend on the job type.
These items are defined by Anthology Student.
Delete or Deactivate Scheduled Jobs
You can use the Background Processes page to delete or deactivate scheduled jobs.
-
Deleting an item permanently removes it. No record of deleted list items is maintained in Anthology Student.
-
Deactivating an item keeps a record of it in Anthology Student (preferred).
Procedure to Delete Items
- Highlight the item in the list.
- Select the Delete button on the toolbar.
The item is:
- Removed from the list on the page, and the list is redisplayed
- No longer available to select on the forms that contain the list
Procedures for Deactivating Items
There is more than one method for deactivating an item.
| Method | Procedure | Result |
|---|---|---|
| Using a toolbar button |
|
The item:
|
| Editing the item |
|
Because the item is not removed, you can also make it active again by selecting the Activate button.
Limitations
You cannot delete items that have a Yes in the System Job column. These items are defined by Anthology Student.